Getting started with a teleprompter can feel daunting, especially if you're new to using this tool.
Many beginners struggle with maintaining natural eye contact, managing scroll speed, and avoiding distraction while reading from the screen.
However, with the proper guidance, setting up a teleprompter can be quick and seamless, even for beginners.
This guide to instant teleprompter setup for beginners covers everything you need to know, from selecting the right tools to ensuring a smooth delivery. Whether preparing for a video shoot, a live presentation, or content creation, this step-by-step approach will help you learn the teleprompter basics in no time.
Here, we will walk you through essential tools, step-by-step setup, troubleshooting common issues, and expert tips.
Let us start with understanding the basics of a teleprompter.
Understanding the Basics of a Teleprompter
A teleprompter is a device that allows a speaker to read a script while looking directly into the camera or at the audience. It works by reflecting a display screen onto a piece of glass in front of the camera lens. This setup ensures the script is visible to the speaker but remains hidden from the audience.
The primary advantage of using a teleprompter is that it helps you maintain eye contact while staying on script, which is essential for delivering an engaging presentation. Whether you’re a content creator, public speaker, or business executive, learning how a teleprompter works can significantly improve your delivery and boost your confidence.
Now that you understand what a teleprompter does let’s explore the essential tools you’ll need to set one up successfully.
Before understanding the setup process, having the right tools is important. Here’s a comprehensive list of essentials to ensure a smooth teleprompter experience:
1. Teleprompter Device:
- Tablet-based teleprompters: These are among the most popular options for beginners due to their affordability and ease of use. The beginners rely primarily on a tablet or smartphone to display the script. Devices like the Parrot Teleprompter are designed for portability and simplicity, making them ideal for on-the-go setups. The tablet or smartphone is placed in a mount, and the teleprompter software mirrors the text on the screen for reflection.
- Traditional teleprompters: These are typically used in professional settings. They consist of a monitor, beamsplitter glass, and mounting hardware for larger cameras. While they provide more advanced features, they can be expensive and might need to be sized appropriately for beginners.
2. Teleprompter App:
- App essentials: A reliable teleprompter app controls your script’s display. Look for adjustable scroll speed, text size, and mirroring capabilities. FoxCue is an excellent choice for beginners. It offers a range of features designed to enhance the teleprompter experience, such as music integration, green screen replacement, business outro integration, and more.
- Remote control support: Some apps, like Teleprompter PAD or Parrot Teleprompter, offer remote control capabilities. These allow you to adjust the scroll speed or pause the script without touching the device. This is especially useful when you’re recording solo or need to maintain a steady pace without interruptions.
3. Camera or Smartphone:
- Camera options: Whether you’re using a DSLR, mirrorless camera, or smartphone, it’s essential to ensure your device is compatible with the teleprompter. Cameras with a flip-out screen can help monitor your framing while using a teleprompter.
- Smartphone compatibility: For beginners, a smartphone is often the most accessible recording device. Modern smartphones have high-quality cameras that can produce professional-looking videos paired with a teleprompter. Make sure to use a sturdy tripod to avoid shaky footage.
4. Mounting Equipment:
- Tripods and mounts: A stable tripod is essential for securing your camera and teleprompter. Look for a tripod with adjustable height and a fluid head for smooth panning and tilting. If you’re using a smartphone, consider a tripod with a phone mount or a gimbal for added stability.
- Teleprompter mounts: Some teleprompters require specific mounting hardware to attach to your camera. Ensure the mount is compatible with your camera’s lens and provides a secure fit to prevent movement during recording.
5. Lighting:
- Lighting considerations: Proper lighting is key to avoiding glare and reflections on the teleprompter glass. Soft, diffused lighting eliminates harsh shadows and ensures your face is well-lit. Consider using ring lights, softboxes, or LED panels positioned at an angle to minimize reflections.
- Backlighting: A subtle backlight can help separate you from the background and add depth to your shot. This technique, known as rim lighting, enhances the overall production quality of your video.
With your tools in place, you’re ready to set up your teleprompter for the first time.
Want to Set up a Seamless Teleprompter in No Time?
Explore FoxCue today for AI-assisted scriptwriting, HD recording, advanced production tools, and more.
Step-by-Step Guide to Teleprompter Setup
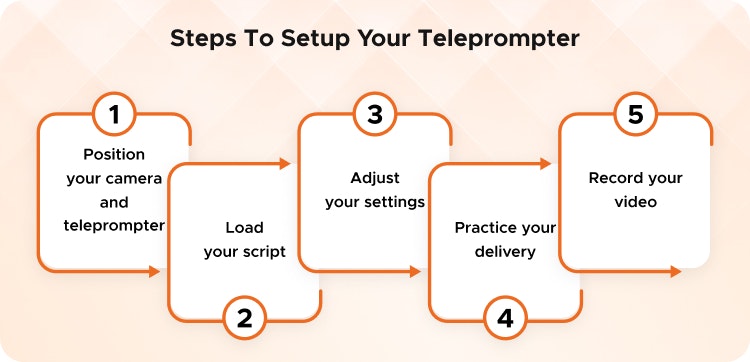
Setting up a teleprompter can be straightforward if you follow these steps. Here’s a detailed breakdown to ensure you get the most out of your setup:
1. Position Your Camera and Teleprompter:
- Camera placement: Begin by setting up your camera on a tripod at eye level. This height ensures that you maintain natural eye contact with your audience. If you use a traditional teleprompter, mount it directly to the camera lens. For tablet-based models, position the tablet in the mount and align it with the camera.
- Teleprompter alignment: The teleprompter’s reflective glass should be angled 45 degrees before the camera lens. This setup allows the script to be visible to you while remaining invisible to the camera. Ensure the teleprompter is securely mounted and the camera lens is centered behind the glass.
2. Load Your Script:
- Script preparation: Before uploading your script, format it for easy reading. Break up the text into short paragraphs and use a legible font size. Avoid dense blocks of text that can be difficult to read while speaking.
- Script upload: Open your teleprompter app and import your script. With FoxCue, this process is seamless, allowing you to drag and drop your file or create a new script within the app. It can also help you refine your script, maintaining its conciseness and engaging power.
- Script editing: Review your script in the app after uploading and make any necessary adjustments. Ensure that the text is free of typos and that the content flows naturally. This step is essential for delivering a smooth performance.
3. Adjust Your Settings:
- Text customization: You can customize the text size, font style, and color to match your preferences. Larger text sizes reduce eye strain and make it easier to read from a distance. FoxCue offers a range of customization options, such as mirrored text, different sizes, and more.
- Scroll speed and control: Adjust the scroll speed to match your speaking pace. Start slow, then gradually increase the speed as you gain confidence. FoxCue allows for precise control over scroll speed, ensuring it aligns with your natural cadence. If your app supports remote control, test it to see how it affects your pacing.
4. Practice Your Delivery:
- Rehearse multiple times: Practicing multiple times is key to perfecting teleprompter use. Start with a read-through to familiarize yourself with the script, then progress to full rehearsals where you focus on delivery. Record a few practice sessions to review your performance and identify areas for improvement.
- Body language and expression: As you practice, pay attention to your body language and facial expressions. The teleprompter should help you maintain eye contact, but your delivery will be more engaging if you use natural gestures and expressions. Aim to convey enthusiasm and confidence in your message.
- Pacing and pausing: Practicing your pacing is important for a smooth delivery. Teleprompters can make it tempting to rush, so be mindful of your natural speaking rhythm. Include deliberate pauses to emphasize key points and allow the audience to absorb your message.
5. Record Your Video:
- Final check: Before you start recording, double-check your setup. Ensure the teleprompter is aligned correctly, the script is properly loaded, and the scroll speed is set comfortably. Check your lighting and audio to ensure everything is ready for a smooth recording session.
- Start recording: With everything in place, begin recording your video. Maintain your focus on the camera lens as you read from the teleprompter. Your practice should pay off by this stage, resulting in a polished, confident delivery. If you make a mistake, pause, reset, and start again from a comfortable point in the script.
Once you complete these steps, you’ll be ready to tackle common challenges that might arise during your teleprompter setup, as discussed next.
Troubleshooting Common Issues Faced During Teleprompter Setup
Even with careful preparation, you might encounter some challenges during setup. Here’s how to troubleshoot common issues:
1. Glare on the Glass
If you notice glare on the teleprompter glass, adjust your lighting setup. Position lights at an angle and avoid direct light on the glass. Diffused lighting or softboxes can help minimize reflections.
2. Text Visibility
If the text appears faint or difficult to read, increase the text size and contrast in your teleprompter app. Ensure the screen brightness is adequate but not too bright to avoid washing out the text.
3. Eye Movement
If your eyes move noticeably while reading, slow down the scroll speed or increase the font size. You can also practice scanning the text with your eyes without moving your head.
4. Script Misalignment
Ensure that your script is correctly mirrored and centered on the screen. Use the app’s adjustment tools to align the text with your line of sight.
Once you’ve addressed these issues, you can refine your technique with the following expert tips.
The Bottom Line
Learning an instant teleprompter setup is more than just ticking off a checklist—it’s about bridging the gap between intention and impact. As we have seen, the right tools and techniques can transform the daunting set-up process into a smooth, professional experience.
For beginners, starting with a teleprompter app like FoxCue is an intelligent choice. It offers a user-friendly experience, robust features, and the flexibility to create and edit scripts seamlessly.
As you fine-tune your setup, know that the tools you use are just the beginning—the real power lies in how you wield them.
Remember—
It’s not just about reading a script; it’s about telling your story!
Deliver Confidence and Precision on Camera with FoxCue Teleprompter
